

If you’ve got an iPhone, or an Android, or a Mac, or a Windows 10 computer, then you’ll know that when you do an upgrade, the device almost always reboots during the process, sometimes more than once.
You can see why that’s a good idea: if you want to update critical system files, it’s much easier if you can be sure they aren’t in use at the time.
And if you have update B that depends on update A having gone through correctly first, it’s often very handy if you can reboot once to get A sorted out, and then reboot again to deal with B.
So, for all that we often gripe about reboots, because you can’t use your computer (or your phone, or whateveritis) while it’s restarting, they do help to make the complex process of upgrades more reliable, especially on devices that we’ve customised extensively with our own array of interdependent apps and services.
One thing that makes today’s typical upgrades much more palatable is that, even if they take a long time to complete, you rarely need to do anything along the way.
You won’t get asked an interminable and apparently unrelated series of questions at randomly-spaced intervals during the process, as happened in the old days when you installed Windows 95.
In fact, you can go off and do something else, and when you come back, it’ll be just as if you turned your computer off for a bit and have now turned it back on.
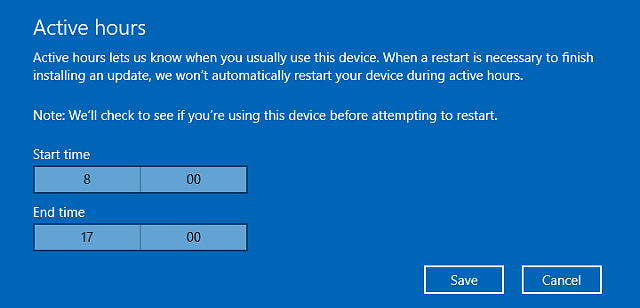
Windows 10 even lets you choose your active hours, and will do the work for you automatically outside those times if you aren’t using your computer.

Why does this matter?
Well, if you use full disk encryption – BitLocker on Windows or FileVault on macOS, or the built-in device encryption on iPhones and modern Androids – you have probably already noticed that you don’t have to enter your password during the upgrade process, even if the computer reboots along the way.
To complete the process when you aren’t around, or when you are around but would like to focus your attention on something else, the updater needs to keep your encrypted volumes unlocked during the upgrade, by some means or other.
Strictly speaking, that’s not much more of a security risk than at any other time that your computer is up and running.
When an encrypted drive is mounted and in use, the system needs access to the disk decryption key, and that’s the way it’s supposed to be.
In theory, a crook can’t get at your data using your computer, encrypted or not, as long as you lock your screen (and there aren’t any lockscreen bugs, of course).
But if he powers down your computer to go off and crack it somewhere else, he’ll need to know your password to remount the encrypted volume.
Note that having access to the disk decryption key isn’t the same as having access to your password, which is typically used just to decrypt the disk key, not to decrypt the disk itself. That’s why you can change your password without re-encrypting the whole disk: only the password protected disk key needs to be re-encrypted. It’s also why, if your password is stolen, you can quickly zap your disk just by wiping the encrypted disk key. Once the disk key is gone, your password no longer has any cryptographic connection with the data on the disk.
Unfortunately, it seems that on Windows 10, at least, there’s a brief period, when your computer reboots for an upgrade, during which you can press Shift + F10 to drop into a recovery console.
You can see where this is going: if you can get into the recovery shell at just the right point in an upgrade, the encrypted volume will still be mounted.
In other words, you just bypassed the BitLocker password prompt, and you can get at data you’re not supposed to see.
What to do?
If you’re at home, the chances are your Windows version doesn’t include Bitlocker, so unless you paid extra for the privilege, this doesn’t apply to you.
A crook with physical access to your computer could just boot it off USB and read your disk anyway.
If you’re at work, or at home with Bitlocker running, you can avoid this issue by not leaving your computer unattended during an upgrade.
Some reports suggest that, on computers managed by Microsoft’s System Center Configuration Manager (SCCM), you can turn off the recovery console altogether by creating a file called:
C:\WINDOWS\System32\setup\Scripts\DisableCMDRequest.tag
(Change the Windows directory name to match your local installation.)
We don’t know whether this works, or even if it’s still officially supported – we can’t find a recent mention of this tweak on any of Microsoft’s technical pages – but there doesn’t seem to be any harm in creating this file if you do use SCCM.
We’re also betting that Microsoft will soon make “no recovery console” the default…
…so by the time you next do an upgrade, this whole issue might well be moot.