When the security team first learnt that the Live Discover API was available, we knew this was going to deliver game changing capabilities which could not easily be executed through the Sophos Central UI.
We started to think about the security use cases we could expand upon. One of those at the top of the list was the ability to search the estate for IOCs during investigations on the fly.
Not only would this help us investigate at speed to quickly identify systems of interest, but also track across multiple Sophos Central tenants.
Internally we utilise MISP, an open source threat intelligence platform. During investigations and research, we collate findings under event ids and apply tags to our findings.
We then thought, wouldn’t it be great if we could pull attributes from MISP and have Live Discover API check the estate to see whether any have been sighted? This is where IOC Hunter can help.
Even if you are not using MISP, IOC Hunter allows you to pass IOC data you are interested in, in JSON format directly in the arguments.
Time to kit up, we’re going hunting
To start hunting using IOC Hunter, follow these 6 easy steps.
1. Install Sophos Central API Connector
First things first, make sure you have installed the latest version of the Sophos Central API Connector. The easiest method to get started is to follow the quick start guide.
2. Create the IOC Hunting query on your tenants
Add the ‘ioc_hunter.sql’ file as a saved custom search to your tenants by following these instructions. You can find the query on our team GitHub.
Create your variable names and types as:
Remember the name you gave your custom query when you saved it as you will need it later when running ioc_hunter.py when setting arguments.
Another important thing to note is that you need to give your query the same name across all your tenants–the API will need to determine the query id, and this is done by searching for the query name.
We recommend putting some default values in these variables. Not only will this help with testing your setup, if no variables are passed these will be the ones that are used during the posting of the query using IOC Hunter.
3. Set MISP Configuration
Not using MISP? You can skip this step.
If you are not using the AWS Secrets Manager to store your API key, simply define your MISP instance URL in the `misp_config.ini` file under the misp_instance section.
To find both your API key and instance URL, login to your MISP instance and go to:
Home > Automation
If you are utilizing AWS Secrets Manager to store your API key and are unfamiliar with the steps, follow this AWS tutorial to help you set that up.
Once you have stored your API key you will need to edit the ‘misp_config.ini’ file with the relevant information of where to obtain your key from:
- secret_name: <secret_name>
- region_name: <aws_region>
- API_key: <specified_key_name>
If no AWS data is provided and you have set the MISP flag in the arguments, the ioc_hunter.py file will prompt you for the relevant data when run.
4. Construct your query filter to strategically cast your net across the estate
The aim of the IOC Hunter is not to blanket search your estate each time but rather to focus on a group of systems that could potentially have the IOCs you are querying for.
The API searches themselves have a 600 second automatic termination threshold, so reducing the scope of where the query will be run will help ensure that the search is able to complete in all locations and provide enough results for you to analyse.
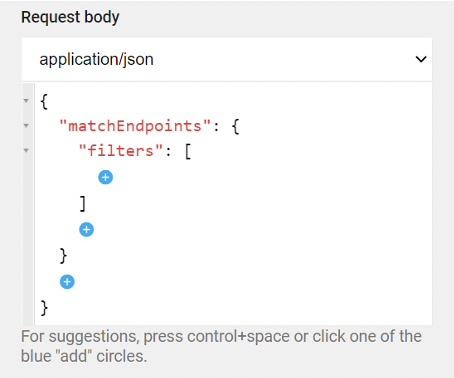
To help we prefill the required elements to run the queries as much as possible. The API allows for granular filtering for your query and can have multiple filters in the array. The API details on posting a run provides a useful tool to help build out your filters.
For example, if you wanted to run the query on all Windows endpoints you can pre-build the filter and copy the details between the filters square brackets to be used in your filter argument:
5. Set query variable data
Now we have the means to search for IOCs we want to specify what exactly those IOCs are and in what timeframe.
The three variables are:
- IOC JSON
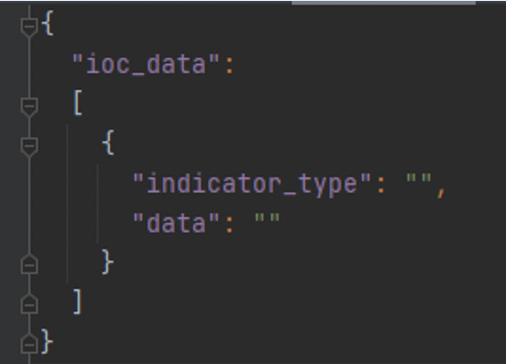
As we alluded to earlier, you don’t need to have MISP to search for IOCs across your estate. You can specify RAW JSON data for IOCs. This needs to follow a certain schema as shown below to be parsed correctly in the Live Discover query:
Valid ‘indicator_type’ entries are:
- ip
- url
- domain
- port
- sha256
- filename, file_path, file_path_name, pathname
The data is a string value and can contain wildcards ‘%’. There will be some examples below for various scenarios.
2. Number of Hours of activity to search
This is the span of hours to search on each asset. Its recommended to search no more than 48hrs. However, this depends on the amount of data your assets collect. You can tweak this as needed depending on the results.
3. Start Search From
This is the starting point of when the data will be searched and is in the format of: %Y-%m-%dT%H:%M:%S.
For example, if you want to search since the start of March 2021, you will pass the variable: 2021-03-01T00:00:00. The query will then search from this point for the number of hours passed in the second variable.
An important thing to note is that the variables have a max size limit of 5Kb. We do verify the size during the construction of the variables at runtime.
6. Hunt
Now we have done the groundwork we can now start hunting! Below are some examples using ioc_hunter.py for given scenarios.
IOCs from MISP event id:
Aim: Search all Windows computers for IOCs related to MISP Event ID 1 over a 24hr period since 1st March 2021.
By breaking this down we can build the arguments we need to run on ioc_hunter.py:
--search_type = saved

--search_input = IOC_Hunter

--filter = “{  \"os\": [    {      \"platform\": \"windows\",      \"type\": \"computer\"    }  ]}”
- N.B. we need to escape the quotes to wrap the filter in quotes and be parsed correctly
--variables:
- Number of Hours of activity to search = 24
- IOC JSON = % (We add the wildcard here as this will be replaced with the relevant IOC data from MISP)
- Start Search From = 2021-03-01T00:00:00 (following the format in variable information above)
--misp = true

--misp_type = eventid

--misp_val = 1
Putting this together we get:
Further examples using the same process as above.
IOCs from MISP tags:
IOCs from RAW JSON:
No variables passed:
Output
Once the searches have completed three JSON files will be created in the tmp folder located:
<path_to_folder>\sophos_central_api_connector\tmp\
- endpoint_data.json
This contains details on the endpoints that the query was run on, this will allow you to check which endpoints failed to run the query so they can be re-queried at a later point.
- result_data.json
This contains any hits on the IOCs or provides details on the outcome of the saved search run. It will also clarify where no results were found on a tenant
- search_data.json
This contains details on the search run and on which tenants. It contains information on the overall outcome of the search.
So, what’s next?
We certainly hope this helps streamline your IOC hunting in your Sophos Central estate and proves to be a valuable tool in your arsenal.
The Sophos Central Live Discover API is extremely powerful and will allow us to expand in many directions. Be sure to star the project on our GitHub page to keep track of upcoming changes.
We have several ideas which are being worked on to integrate with IOC Hunter. Keep an eye out for future updates.
In the meantime, happy hunting!


