

Over the summer I decided to give my kids an old Apple laptop to share.
We use laptops for school homework from time to time but my kids spend most of their screen time poking and swiping tablets. I wanted to broaden their horizons a little: do a bit of coding; a bit of web searching; get them comfortable with a keyboard; give them something valuable that they had to look after; and get the ball rolling with developing some good computer security habits.
The kids have been at school for a few years and they’re are old enough to have a little independence, but most of what they do is supervised or subject to fairly restrictive boundaries.
The Mac would be no exception, there would be boundaries, so I enlisted its in-built parental controls to see what they could do, and how they could help.
This article walks you through the things I did to secure the laptop, and details the parental controls and options I chose. Later this week we’ll walk you through a similar setup for a Windows machine so stay tuned for that.
A clean slate
Because I was reusing an old laptop I decided to wipe it clean and start again. I reinstalled macOS over the internet on to an encrypted filesystem, went through the setup process until I had a working computer with one user account and installed Sophos Home.
I do this whenever a computer changes hands, even in the same household, but it’s not a prerequisite for setting up parental controls. I’m just letting you know what state my laptop was in when I wrote these steps.
All you need is a working Mac that you’re happy for your kids to spend some time on. What is important is that each of your children starts with their own clean slate: a user account that’s theirs and nobody else’s.
Users
As our starting point I will assume you have a working Mac on which you have Admin rights.
Log on to your Mac and go to System Preferences > Users & Groups. On the left hand side is a list of users. Under your name it should say Admin.
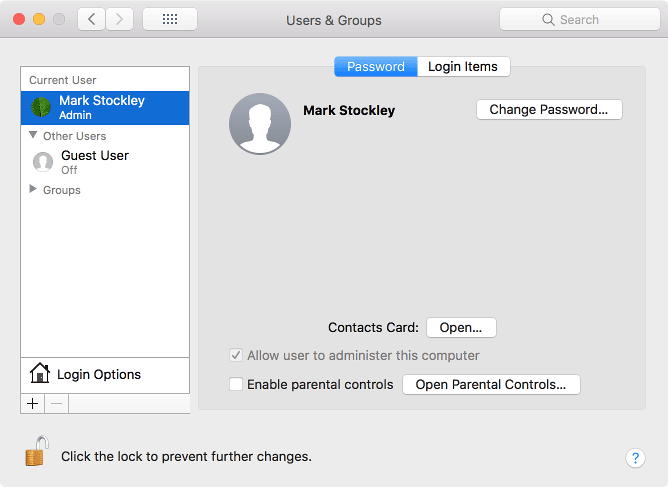
Before setting up parental controls we need to create an account for each child. To add an account, click on the + button.
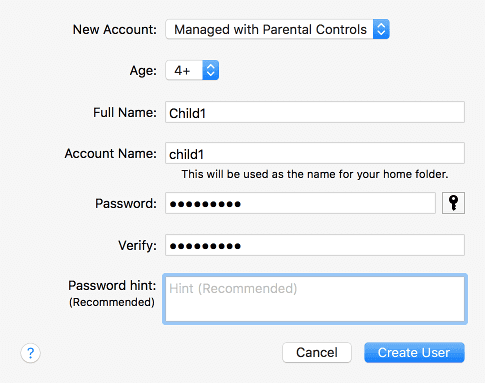
When the new user dialog opens choose Managed with Parental Controls from the drop down and fill in the rest of your child’s details. I suggest you enter a placeholder password at this point – you can help your child to change it later.
When you click Create user you’ll see that your child has been added to the list of users on the left, and that Enable parental controls is ticked.
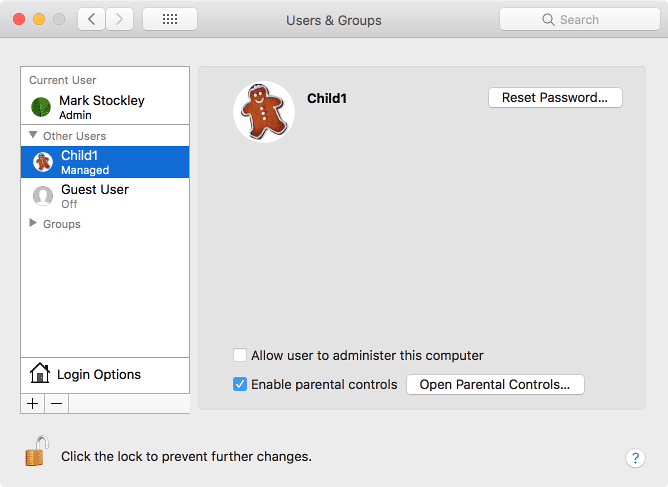
Highlight the child’s name in the left hand menu and click the Open Parental Controls… button.


Parental controls
Different families will require different settings so I’m going to take you through the very restrictive set that I used, as an example, but your mileage may vary.
Whatever your choices, I suggest you apply the principle of least privilege, giving your children the access they need, and no more. If I couldn’t immediately think of a sensible use case for allowing something, I switched it off. It’s easy to change the settings if later if you get something wrong.
As you go through the controls, pay careful attention to the labels because you’ll be using ticks to indicate both positives and negatives – sometimes your tick means allow, at other times it might be disable or restrict.
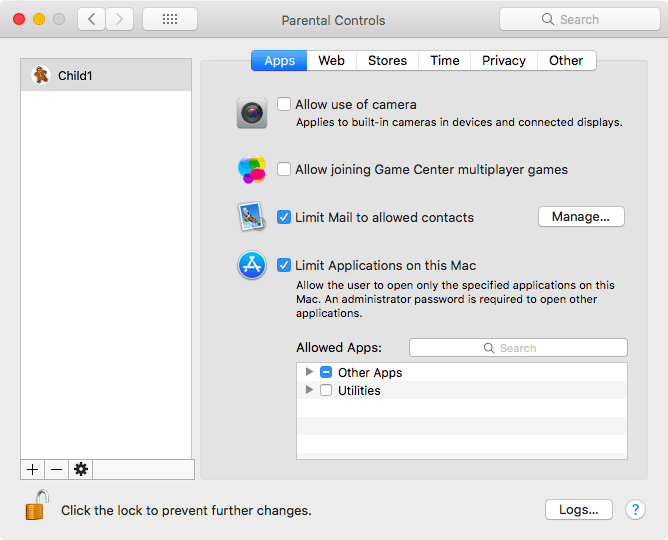
There are six tabs in the parental controls pane: Apps, Web, Stores, Time, Privacy and Other.
Apps
The Apps tab lets you limit access to the computer’s camera, set restrictions on email and multiplayer games, and create an allow list of apps.
I couldn’t think of a reason my children would need the camera or multiplayer games so I unticked Allow use of camera and Allow joining Game Center multiplayer games.
To restrict who can exchange emails with your child tick Limit Mail to allowed contacts and click the Manage… button.
I ticked Send requests to and entered my email address so that I’ll be notified of any attempts to email sombody who isn’t on the allow list.
Click the + button and add the names and email addresses of the contacts you’ll allow.
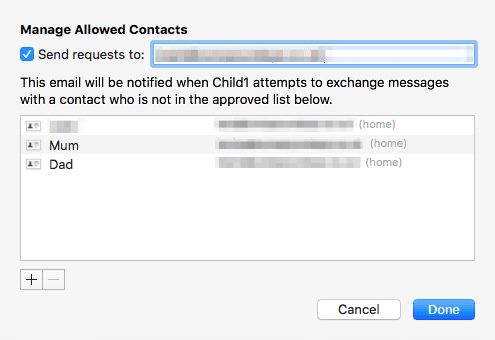
Click Done to return to the Apps tab.
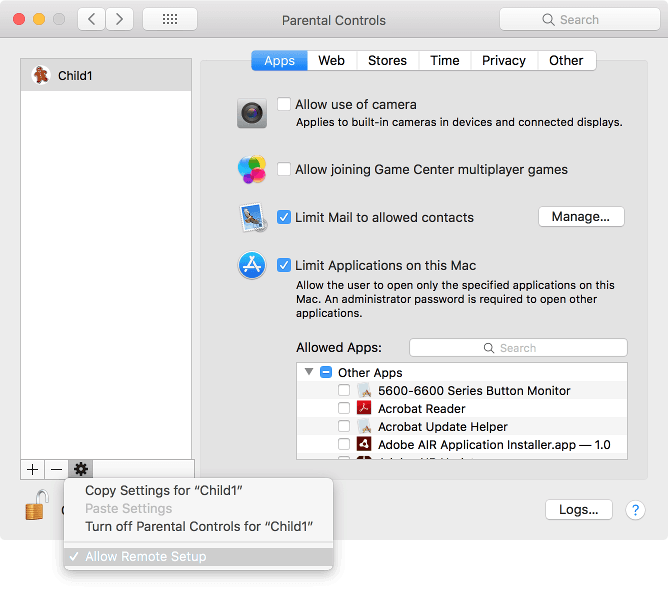
Next, tick Limit Applications on this Mac. Click the arrows to list the apps on your computer. Again, I suggest you take the attitude that everything is off limits unless you have a reason for it not to be.
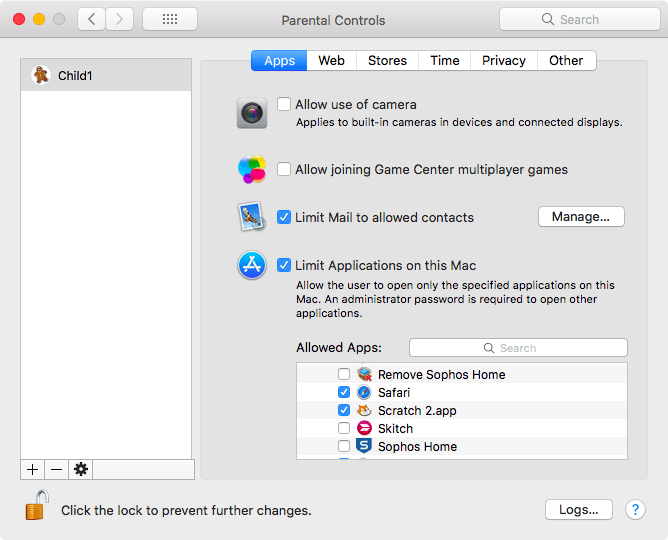
In my screenshot you’ll see that Safari is ticked, giving the child access to the entire web, warts and all. I used the controls in the next tab, Web, to rein that in.


Web
To put some boundaries on my child’s web access I clicked on the Web tab and selected Allow access to only these websites. To add a website to the list click the + button.
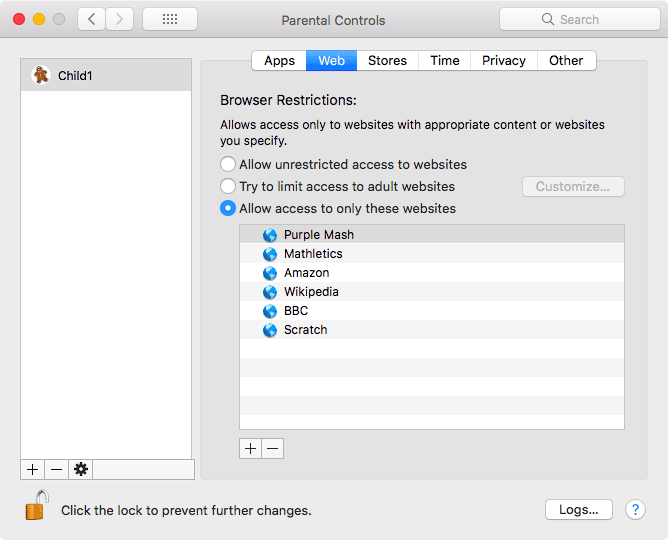
If you want to give your kids more freedom then the second option, Try to limit access to adult websites, might be worth a try. Note that Apple is very clear that it’s trying to limit access with this tool. No filter is foolproof so if you choose this option, understand that undesirable sites may get through the filter, and some legitimate sites might not.
If you enable that option you can also use the Customize… button to open a dialog where you can set your own block and allow lists to supplement Apple’s adult website filtering.
Stores
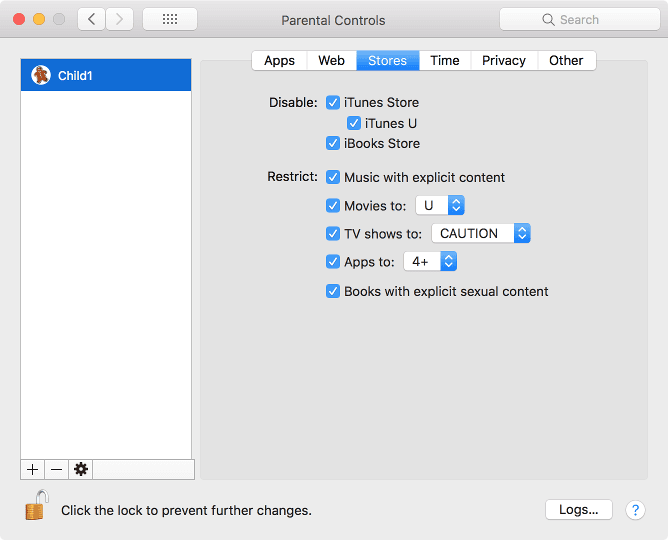
Under the Stores tab you can set up controls for accessing TV shows, books and movies, as well as Apple’s online stores. I ticked options to disable iTunes Store, iTunes U and the iBooks Store.
I also ticked to restrict Music with explicit content, and then ticked Movies to:, TV shows to: and Apps to:, and choose age-appropriate values from their drop downs. Finally, I ticked to restrict Books with explicit sexual content. I couldn’t imagine a situation where that would actually be necessary but the principle of least privilege applies – the child doesn’t need it, so they don’t get it.
Time
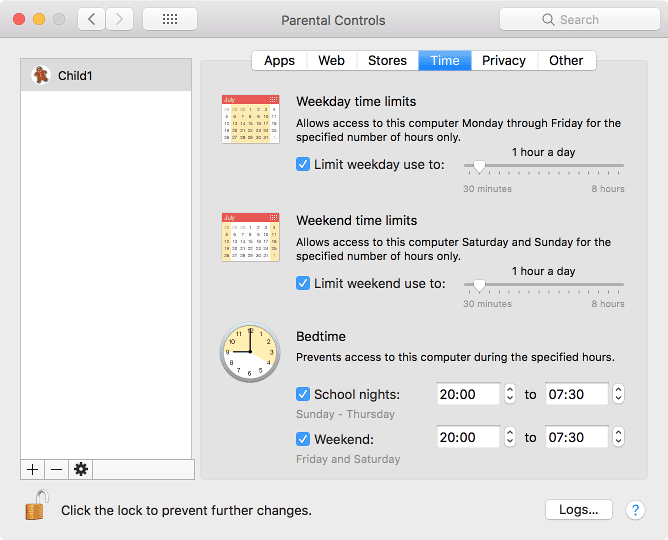
The controls under the Time tab allow you to specify how long your child can use the laptop for, and at what times of day. I chose to limit time to one hour per day at times of day when they’re normally awake.
To cap the amount of time to one hour per day, tick Limit weekday use to and Limit weekend use to, and set the sliders to 1 hour a day.
To prevent access overnight I ticked School nights and Weekend, and set the times to 20:00 and the finish times to 07:30.
Privacy
The Privacy tab limits access to your kids’ data. Under Allow changes to you’ll see a list of items that can be changed by apps on the computer. For example: ticking Contacts allows apps to create new contacts in the address book and unticking it stops that.
I couldn’t think of a good reason to allow Twitter and Facebook so they’re unticked.
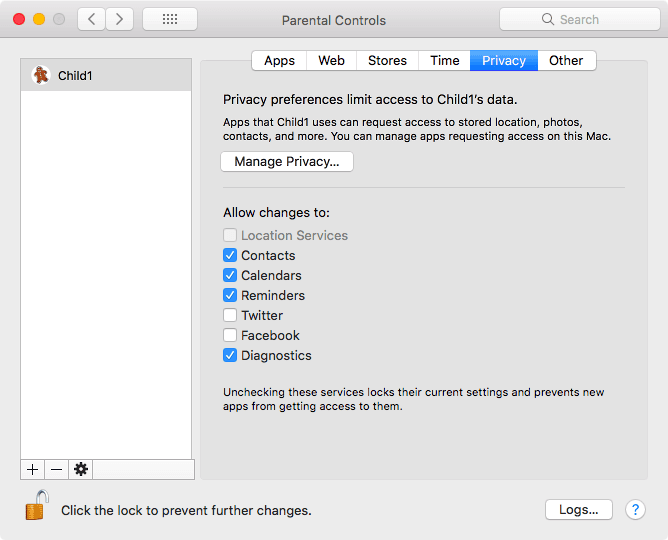
The Manage Privacy… button at the top allows you to see which apps have access to which services on the Mac, and to decide if you’re prepared to allow it. So, if you want Siri and Maps to have access to Location Services, you can set it here.
Either because my Mac was pretty bare, or because of the options I selected when setting up the Mac (such as disabling Siri entirely), there was nothing for me to untick here.
Note that clicking Manage Privacy… kicks you out of the Parental Controls pane and opens up the Privacy tab of the Security & Privacy pane. When you’re done just click the back button to return to the Privacy tab under Parental Controls where you started.


Other
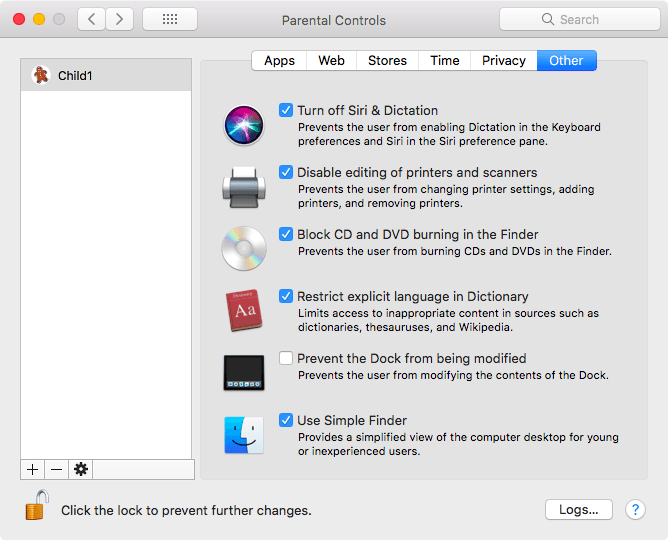
The last tab in the row is Other, and it’s where Apple has swept all the things that don’t fit anywhere else under one rug. Note that the first five options are negative and the last, Use Simple Finder, is positive.
I elected to untick Prevent the Dock from being modified, so my child could customise the appearance to their liking (see the passwords section below for more on that), and I elected to Use Simple Finder, because computers are baffling enough when everything is new.
Remote setup
Hidden away where you’ll never, ever find it is an option to enable remote control of a computer’s parental controls. This feature allows you to modify the parental controls on your child’s computer from another Mac on the same network.
To enable it, click on the settings icon (the cog) under the list of children’s names on the left of the Parental Controls pane, and click Allow Remote Setup.
If you log into a different Mac on the same network and go to System Preferences > Parental Controls you’ll see the name of your child’s computer. If you click on it you’ll be asked for the username and password of a user with Admin rights on that computer. Once you’ve logged in you’ll be able to select your child’s name and modify their parental controls as if you were sat at their computer.

Security & Privacy
Outside of the parental controls there are a few other settings worth paying attention to. In System Preferences open the Security & Privacy pane.
Under the General tab tick Require password and then choose the shortest time you think your child can stand from the drop down list. This gets them used to the idea of logging in to the computer again if they leave it for a while, which is a good habit to develop.
I suggest you also turn on the firewall by clicking the Firewall tab selecting Turn On Firewall.
Passwords
Once the machine is set up, it’s time to introduce your children to it. While I was getting my kids’ laptop ready I spent a lot of time thinking about how to get them on the right track with computer security.
I wanted to get them doing some important things right, straight off the bat, so that they become habits – preferably things that I could build on as they got older, but without bewildering them.
I decided to focus on one thing – passwords are supposed to be secret.
There’s more to creating a strong password than that, of course, but it’s an essential building block. We’ll tackle password complexity when they’re older. For now I decided it’s enough for me that they choose passwords they can remember, so that they can practice keeping them secret.
When it came time for them to choose their passwords we made a performance of it: I told them why we don’t share passwords and that passwords need to be secret, from everyone, forever, even me. I had them choose passwords without telling me what they were, and then they typed them into the computer without me watching.
In that moment, frequently through the day, and occasionally through the summer that followed, we made a game of it by asking them “hey, what’s your password?”, at unexpected moments.
Knowing we’re trying to trick them, they take great pride in not giving them up!
At the same time as they chose their passwords I had them choose their own icon and a desktop background. I’m hoping that this basic personalisation will make them want to log in as themselves, and log out if they open the computer and see somebody else’s desktop.
I want to encourage the idea that it’s normal to have your own account on a computer, and that sharing accounts is a bad idea. (I’ve more or less given up with the adults on this one and decided the only chance for progress is raising a generation that just knows that sharing accounts is bad!)